This is a dorky DIY post about the roof racks I built for our Nissan Xterras.
I bought my Xterra new from the dealer in 2005. That was 196k miles ago (but who’s counting). In 2011 when Karen and I returned from the sailing trip to mountain life, I ditched my busted Thule roof box (can’t remember how I managed to crack it in half, but it was) and built my own rack, with the following design goals:
- Long enough and wide enough for Karen and I to sleep in side-by-side.
- Wide enough to fit two 24-gallon action packers (my camping bin of choice) side-by-side.
- As low profile as possible—hopefully low enough to still fit in parking garages (evidently I had not philosophically left my city-living behind at that point).
- As lightweight as possible—putting lots of weight up high is not good for vehicle handling.
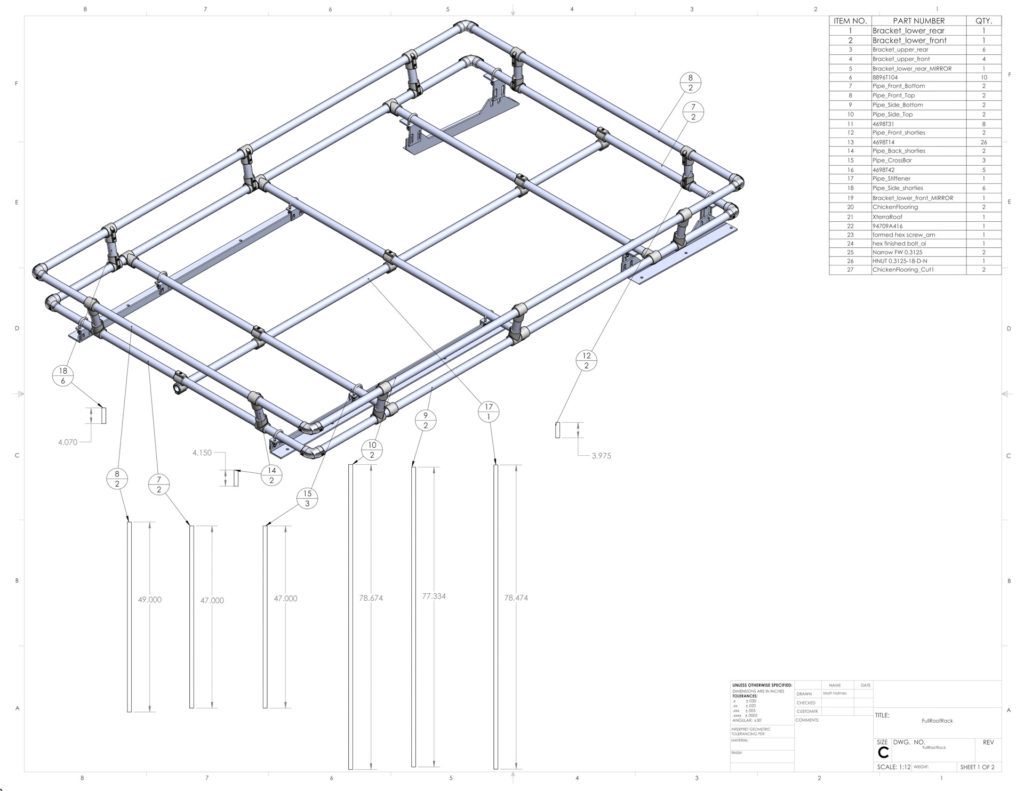
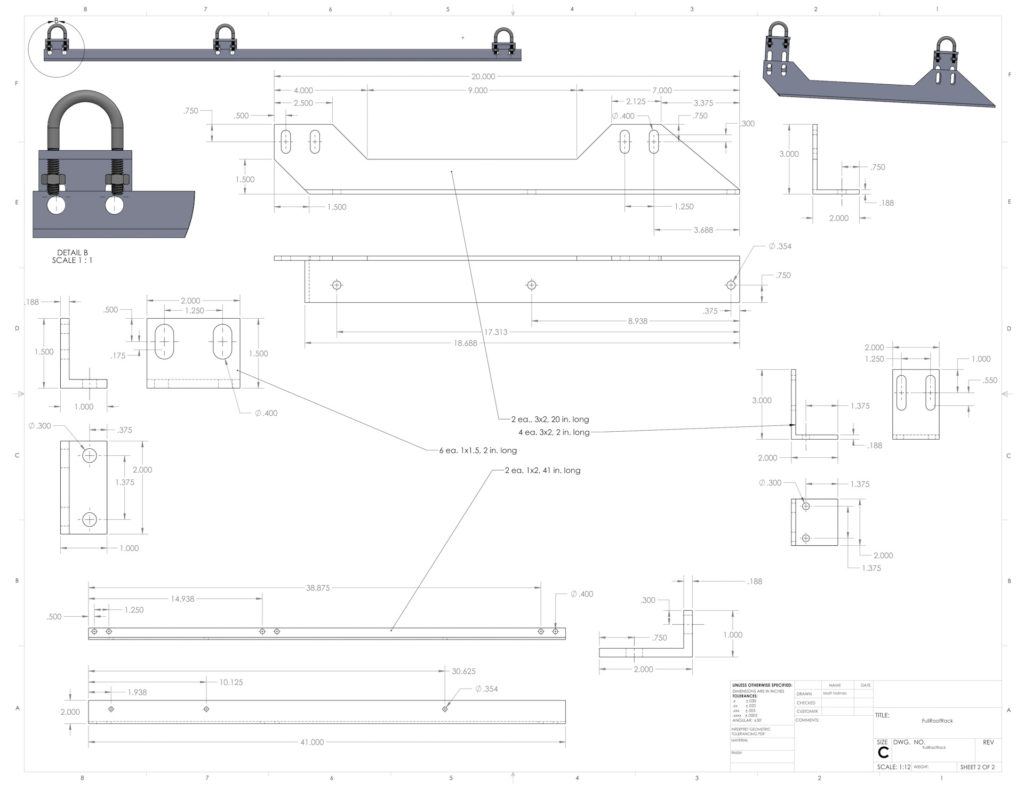
I designed my original rack in Solidworks CAD software; it was a convenient exercise to teach myself the software for my impending job with the lab (back in 2011). It’s not a complicated piece of CAD, except for the surprisingly annoying 3D nature of the roof surface.

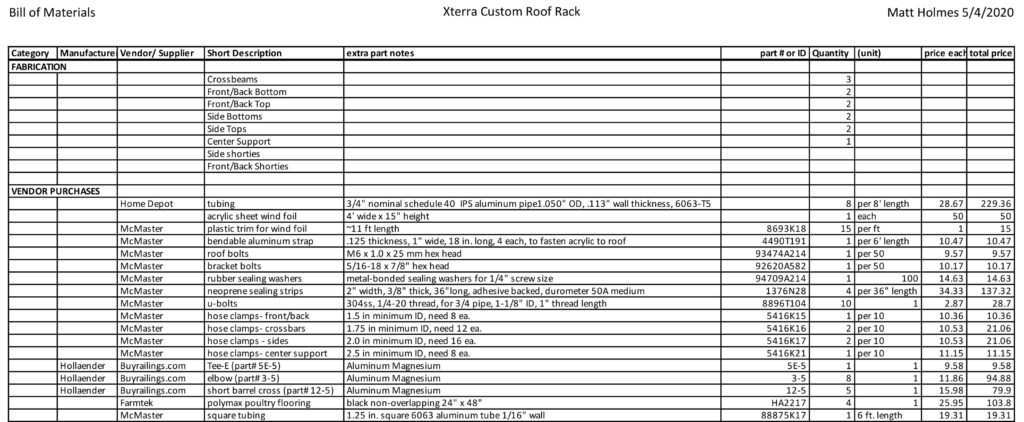
- I went with 3/4″ nominal schedule 40 aluminum pipe (actual outer diameter is 1.050 inch).
- I used Speed-Rail fittings to join it all together.
- I used plastic chicken flooring to span the tubes, providing a large flat walk-able sleep-able surface.
- I used the existing M6 x 1.0 riv-nuts in the roof of the Xterra for mounting.
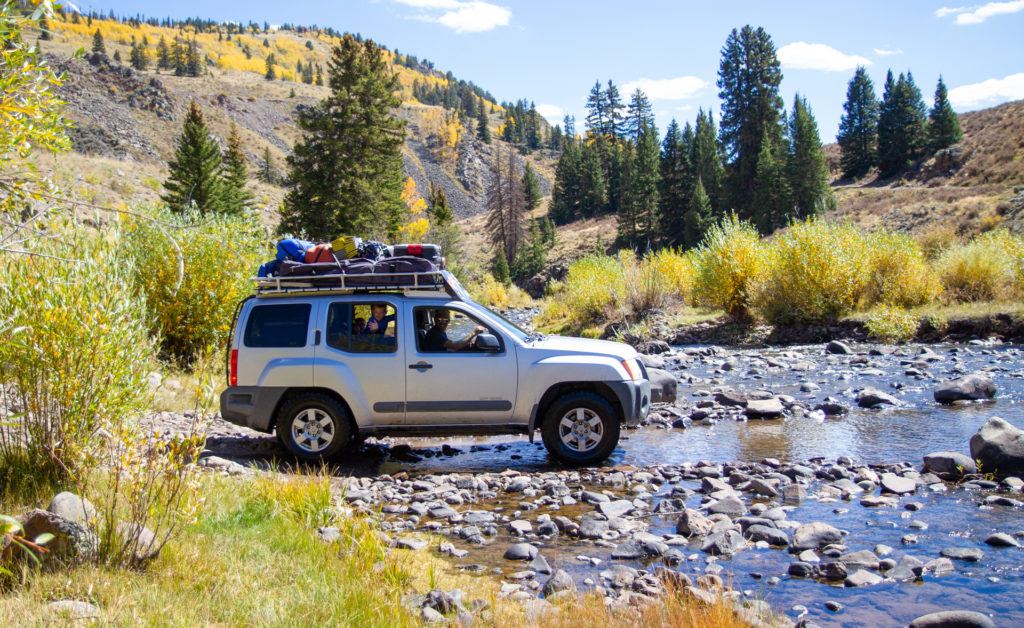
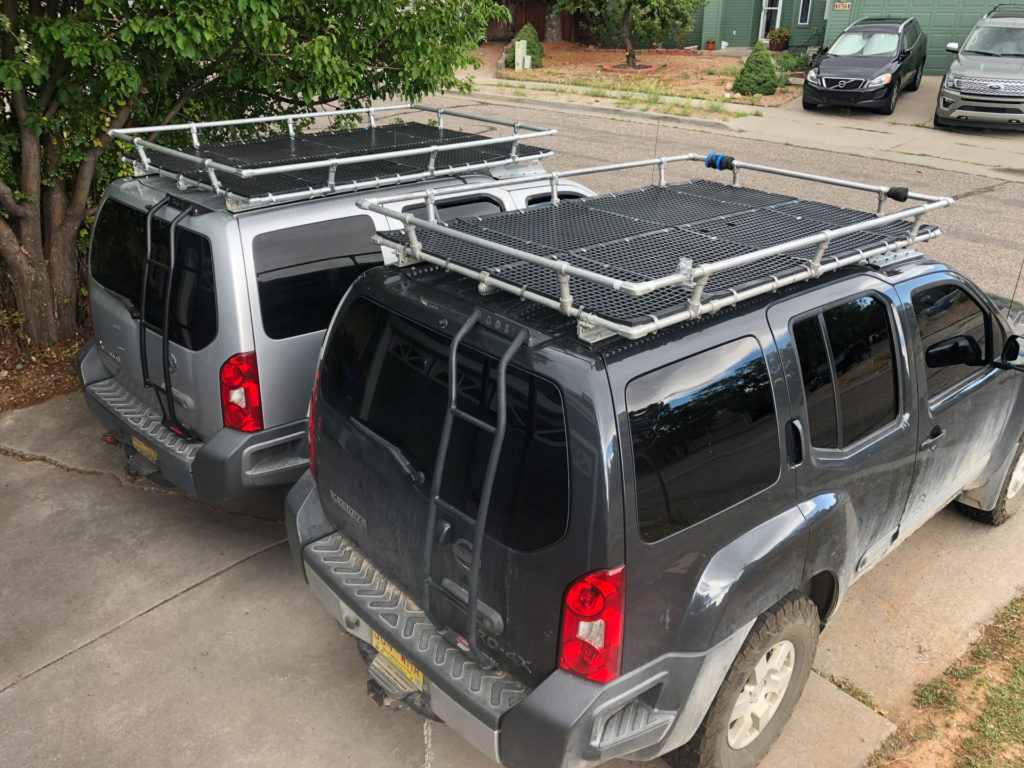
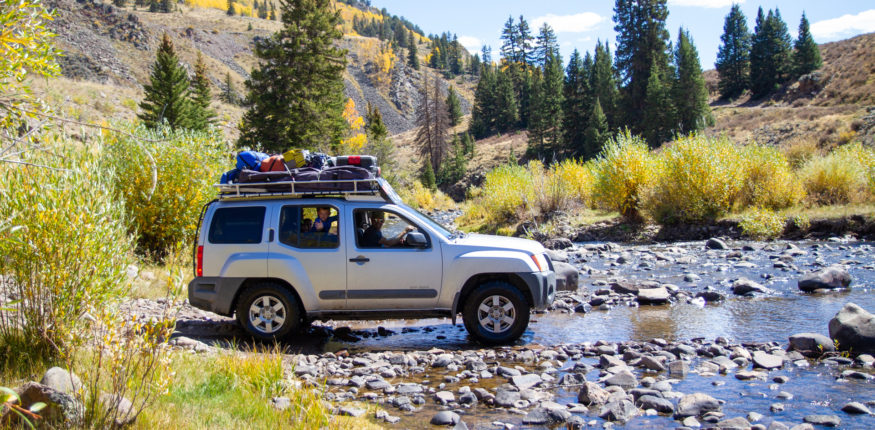
I’m pretty pleased with the result. No, check that, I’m really proud of my rack. The whole thing weighs about 45 lbs total, which beats the pants off the commercially available size-to-weight ratio. It’s truly huge, and stands only 8.5 in. off the top of the car—no higher than the stock roof rack with added thule bars on top (e.g. for a bike tray). There hasn’t yet been a parking garage I can’t use.
I love it, but I don’t get the sense that anyone else is remotely impressed. There’s some sort of message hidden in here… a message to me. Let’s discuss this. In the past nine years of sporting (flaunting) this roof rack around town and the wider western area, I have received a sum total of 6 complements on my rack. That’s just not enough for such an awesome rack. I’m continually surprised that more people don’t comment on my rack. For my part, I am sure to let other people know when I am impressed by their rack. Why don’t people like my rack more? My rack is incredibly practical. And… I’m finally forced to realize… completely unappealing. Most normal people (e.g. those who do NOT enjoy driving long bumpy roads to the middle of nowhere) probably think a big ugly rack is just stupid. And the people that can appreciate big racks prefer a cool-looking, hardcore-looking rack. The key being the “looking” part. My rack is not a looker. I think a good word for my rack would be “ungainly”. Perhaps even “over-large”.
Anyway, in the end I’m still really happy and proud of my own rack, despite the lack of an approbation from others. AND I continue to wonder why other’s don’t appreciate it sufficiently. I am who I am, and my rack is my rack.
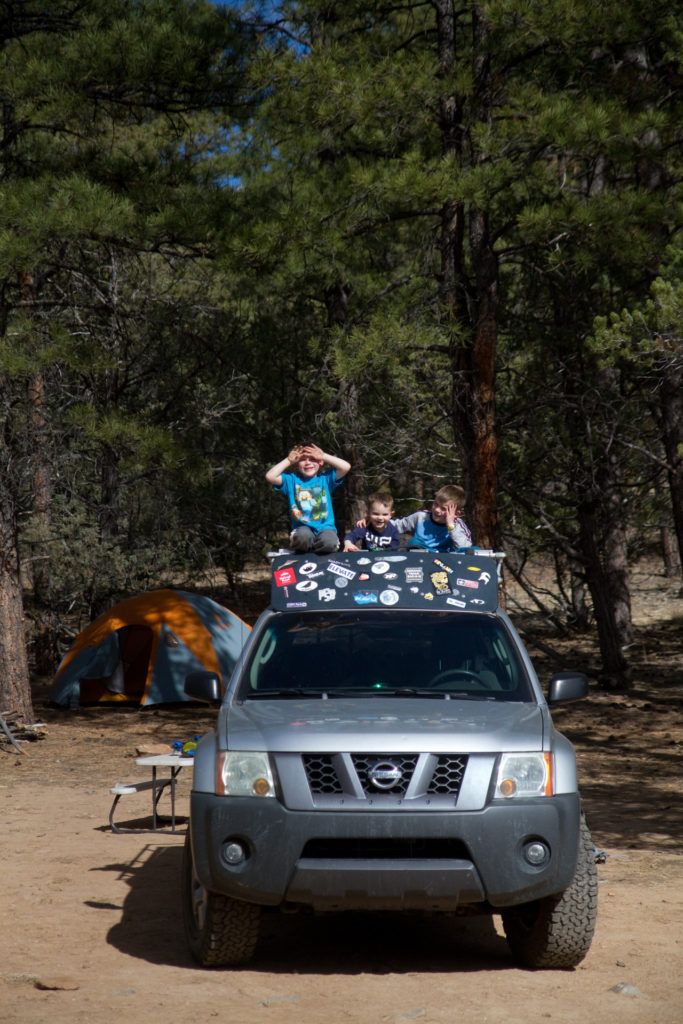
Fortunately, Karen really likes my rack, which is strong evidence to me that we were meant to be together (considering how hard it is to find anyone else out there that likes my rack).
When Karen’s mini-van crapped out last year, we bought a second, used Xterra (also manual transmission, as luck turned out). The new one is a 2013, now just a hair under 100k miles (but who’s counting), and is nearly identical to my old one. Most relevant for the purposes of this post: it has the same bolt-hole pattern in the roof.
Last month we were about to depart on a road trip to Utah (self-note I still have to write a post about that trip) and my old Xterra threw a “camshaft over-advanced code.” When googled, the possible consequences of such a code are not problems that one wants to experience in the middle of nowhere, with no other vehicles along to back one up. Consequently, I moved the roof rack from my old Xterra over to Karen’s new one, so we could use the more reliable X instead.
The problem was, when I tried to remove Karen’s existing stock roof rack it ended up coming off in hacked up pieces. I wish I had photos: it wasn’t pretty. When I started, I didn’t intend to chew it apart with the grinder, but one thing led to another. Specifically, the riv-nuts in the sheet metal of the roof twisted out, the bolts were countersunk down into the plastic, and I wasn’t about to pull the headliner. I had no other alternative, honest truth.
Anyway, we ended up with two Xterras and only one roof rack of any sort between them. I doubt you’ve ever seen an Xterra without any roof rack, but it’s a sorry sight. Naked and sad. Unfulfilled. Unsatisfied. Clearly, I needed to build a second identical roof rack.
Inevitably, I had forgotten exactly how much work (and money) had gone into the first one, but the job is finally done and it provides COPIOUS blog material with which I can bore everyone to death!
Without the roof rack we as a family would not be able to camp the way we do. The X is not a large SUV. We simply would not be able to carry all the stuff for camping with three boys on long road trips without the custom roof rack. In the 9 years that we have employed the rack, it has justified the construction effort and cost many, many times over.
We typically use the rack to carry the 10 ft x 10 ft canopy that completely saves rainy camping trips, the plastic folding table that makes cooking pleasurable, a mini plastic folding picnic table for the boys, the camp chairs, sleeping bags, sleeping pads, tent, an action packer with firewood, a small action packer with Xterra gear (tow-rope, spare oil, etc), and the recovery ramps if we’re going someplace we might get stuck.
Karen and I never ended up sleeping in it together that I remember, but consider that we did have our first child only months after I built the rack, so…
Alone, I have slept up there precisely twice. So, using it for sleeping didn’t end up being as common as I had envisaged. Mainly because it’s more practical to store gear up there than my sleeping body—which can always go on the ground in any situation when it could have gone on the roof…
Some superfluous comments about the design:
- When I built the second rack just this month, I added more riv-nuts in both roofs because of the issues with Karen’s twisted riv-nuts. The riv-nuts are still not as confidence inspiring as I would like, but there’s no good alternative. I have lots of them now, at least. I had never used riv-nuts before, but they’re easy.
- The SpeedRail fittings are a bit pricey (about ~$8 each) but it makes it casual to assemble the round tube. They’re cast from some Aluminum-Magnesium alloy (535 Al-Mag) that is very lightweight and also quite corrosion resistant (I still wouldn’t use it on a sailboat though—only 316 stainless on the salt water if it can be helped).
- I can take no credit for planning this, but the holes in the chicken flooring are the perfect size for the hook on a standard bungee strap (the real ones—the black rubber half-flat ones, not the round fabric bright colored crappy ones). Initially I thought that I would use cam straps, but I evolved to using exclusively bungees of various sizes. Items get strapped individually or in sensible groupings; that way I can remove just the folding chairs or just the canopy or just the sleeping gear, and leave the other stuff strapped. FYI the perfect black bungee length for the 24-gallon action packer is 31 inches.
- If money were no object, I would have a shop mill the tube ends to the proper curved mating shapes and have a skilled welder weld it together, eliminating the SpeedRail fittings. But the welder would have to be excellent, and the fit on the tubes would still have to be impeccable, in order for the joints not to be a weak link. That quantity of welds and milled angled ends would be pretty expensive. I have some experience with this—for the sailboat I learned how to TIG weld so I could build a bimini for the stern of Syzygy out of 304 stainless pipe. In order to cut the tubes to the proper curved mating shape I used an online app to create the correct curve on paper (given pipe OD and desired intersection angle), printed out the shape, wrapped it around the tube, then went to town with the angle grinder. I spent DAYS prepping those tubes to the right shape with the cutoff blade and grinder; it turned into a full-on art project of check/modify/check/modify to get the fit good enough to weld. And my welds were not pretty. They turned out to be strong enough, but that’s probably because it was MASSIVELY overbuilt (and way too heavy). But it did support our huge solar panels, wind generator, and GPS and wifi antennas for thousands of miles across the ocean, so it worked out in the end. But that was welding stainless—welding aluminum is HARD. Super hard. Way beyond me. Of course, I’m no welder, even my ss welds were atrocious.
- The first roof rack I used 6061-T6 aluminum pipe, which is ~36 ksi yield strength. This new second rack I used 6063-T5 aluminum, which has a ~16 ksi yield strength (it was much cheaper this time than the 6061). I hope the lower strength material is fine—time will tell. As a consolation prize, the new weaker tubes are more attractively matte-finished (as if it matters to me—see earlier conversation about how I feel about my rack).
- The first time around, I used heavy-duty plastic zip ties to fasten the chicken flooring to the metal frame. This was not ideal: the chicken flooring has held up fine under the sun, but the zip ties would regularly wear out break and need to be replaced. It was annoying trying to replace the zip ties with the rack on the roof (there is insufficient clearance to fit a hand between the rack and the vehicle roof). When building the second rack, I took the opportunity to eliminate all zip ties off both racks, replacing them with stainless hose clamps. This is so obviously superior that I wish I had taken off my own roof rack years ago and made the switch. It has to be done before it goes on the roof though, as there’s no way to reach the hose clamp screws after the rack is mounted.
- I tried very hard to carefully measure the shape of the Xterra roof and location of the existing bolt holes in order to have everything fit right the first time. But, as so much real-life engineering goes, the final 5% to the finish line ended up being an art project and kludging (and took 80% of the time). In this case, most of the issues can be blamed on the roof—it’s a full-on 3D shape, holes aren’t on the same plane, aren’t in a line, aren’t facing the same angles, etc. So there was a fair amount of enlarging holes, cutting bits off brackets, that I could have done without. It was harder in that sense than some of the complicated CAD design I’ve had to do for work.
- The Gobi ladder for the back is crucial; without it, I could never get up and down from the roof easily enough to make the roof rack viable.
I love your rack. I see beauty in such creations.
thanks dad.